Monday, September 13, 2010

Doughnut Pops


I like the idea when I came across The Little Teochew on this doughnut pops.... kids love it!

Steamed Fish Paste with Tofu


My kids and I like this very much after 1st attempt and it's then becomes my regular dish ^.^ thanks to Blessed Homemaker.

It's indeed a very simple dish and yet delicious & healthy!


Ingredients:
1. 1 stick of egg tofu
2. 1 serving of fish paste (I bought from NTUC)
3. Pepper to taste
Optional:
- carrot (chopped)
- some spring onions

Method:
- Just mashed together all ingredients and steamed for 10minutes.


Wednesday, August 11, 2010

Chocolate Sponge Cake


The photo posted on Sweet Crumbs attracted me to try out this recipe ^.^, go take a look.

Weird huh... why this has became small tiny cupcake? hahaaa.. cause daughter wanted to help, so, I let her scoop the batter into the cupcake instead of pouring all the batter into 8"-pan :)

The texture and taste of the sponge cake was just nice, is a keeper. Not too sweet is the reason why I would note down the recipe here for future reference ^.^


Ingredients:
(A) Egg Yolk Mixture
- 3 egg yolks
- 50g sugar
- 120g self-raising flour *
- 1/2t baking powder *
- 1/2t baking soda *
- 50g canola oil
- 1t vanilla essence
mix together * and sift.

(B) Cocoa Mixture
- 30g cocoa powder
- 120g warm water
stir till smooth.

(C) Egg White Mixture
- 3 egg whites
- 1/4t cream of tartar
- 60g sugar

Method:
1. Mix (A) manually till well blended.
2. Add (B) mixture into (A) till well blended.
3. In another bowl, beat egg whites and cream of tartar at high speed for 1 min. Gradually add 60g sugar and beat till fluffy.
4. Fold (C) mixture in 3 batches into batter gently.
5. Pour batter in 8" square or round pan and bake at preheated oven @ 175C for 40-45mins.


Monday, August 2, 2010

Kueh Lapisan - 九层糕


Promised my grandma-in-law to try out this kueh lapisan long time ago and finally made it this round.

With my creativity, I've added some corn-puree to the last layer :)
With or without the corn-puree, I feel that the texture of the kueh was not as soft/light as what we usually bought in the market.

Those that bought in the market normally covered with oily-surface, however taste wise not as good as mine. Maybe I need to adjust the amount of water called in the recipe accordingly. Recipe calls for 280ml-375ml warm water, but I only added 260ml.

Ok, talking about the photo, hahahaa.. my daughter complained that how come her head was "chopped-off".. I said my focus should be on the kueh and not her but still, I let her squeezed in. She accepted the explanation happily ^.^


Chocolate Hazelnuts Melts Muffin


Well, this batch of cupcakes was prepared by my maid, ah-sih. She was so happy with the result ^.^ Original recipe from a book from library, Muffin Magic. This book introduced a very simple way of preparing muffin and even your kid can do it with minimum help from adult ^.^


Both my husband and brother also commented GooOOOD! But to me, I feel a bit too sweet. Suggested to my maid maybe we can try replace Nutella filling with melted-dark-chocolate or reduced the sugar ^.^


Ingredients:
- 100g or 1C toasted hazelnuts (chopped), plus extra (whole hazelnuts) to decorate
- 200g or 1 1/3C plain flour
- 1T baking powder (I reduced to 2t)
- 3T cocoa powder
- 150g sugar (should reduce to 120g, else too sweet)
- 1 egg, beaten
- 200ml buttermilk
- 2T milk
- 85g butter, melted
- 4T Nutella or other chocolate and hazelnut spread (for filling)

Method:
1. Preheat oven to 190C.
2. Combine nuts with flour, baking powder, cocoa and sugar and sift into large bowl. (Don't worry if all the nuts don't go through, just sprinkle them over the top.)
3. In separate bowl, combine egg, buttermilk and milk. Then stir in butter.
4. Pour WET mixture into dry ingredients and stir until just combined.
5. Spoon small dollops of mixture into prepared muffin cup. Using back of the teaspoon to make a slight indent in the mixture and spoon 1t Nutella into the centre of each muffin. Top with the remaining mixture and press a few whole hazelnuts into the top.
6. Bake for 20mins till risen and firm to touch.


Wednesday, July 28, 2010

Chocolate Banana Marble Cake


After so long, finally pick up the mood to bake "cake"... this round, because of the 3riped bananas hanging in the kitchen, thus trying to "utilize" it :P

The recipe called for buttermilk and the result was good! The texture was just nice. It's a keeper!


Ingredients:
- 1C mashed ripe banana
- 1/4C buttermilk @ room temperature
- 2t vanilla extract
- 2C sifted cake flour
- 1t baking soda
- 3/4t baking powder
- 1/4C cocoa powder
- 3T boiling water, plus more if needed
- 170g unsalted butter, softened
- 1C sugar
- 2 eggs at room temperature

Method:
1. Preheat oven @ 176C and position oven rack in center. Lightly greased loaf pan with melted butter and line with parchment.
2. Add buttermilk and vanilla into mashed banana and whisk till blended.
3. Sift cake flour, baking soda and baking powder in a medium bowl.
4. Place cocoa powder in small bowl and stir in boiling water till forms smooth paste - it should run thickly off the spoon. If too thick, add another T of boiling water. Set aside.
5. Place butter and sugar and beat @ medium speed till light and almost white in color (4-5mins). Turn to slow speed and add the eggs (1-by-1) till well blended.
6. Pour flour mixture and banana mixture alternately in 3 batches. Manually blend in by hand at last.
7. Transfer half batter to another medium bowl, add cocoa paste and gently blend into the batter.
8. Drop alternating spoonfuls of dark and light batters into prepared pan and marbleize by spoon. See figure below.
9. Bake for 55-65mins until firm to touch and toothpick inserted into the center of the loaf and comes out clean.


Thursday, July 8, 2010

Stir-Fried Beef with Kang Kong


Another favorite dishes of mine. Well, just buy whatever needed and give a call to my mum before cooking and huar-larrrrr... my stir-fried beef with kangkong, finished and loves one enjoy it!

Red Bean Curd with Pork


My mother cooked this dishes during my confinement day and I missed it so much and wanted to prepare it myself. Instruction and steps? Just a call to my mother.

The outcome not the same version of my mom's but my husband likes it! phew....

Angelica Steam Chicken


A simple meal that I've prepared for myself and family ^.^

Normally I will cook this at least once or twice a month.

Jammers


Original recipe from "the Art & Soul of Baking" by Cindy Mushet.

I remembered the title and the author clearly as I was "house-keeping" my recipe and copying the recipe to my note book, there are plenty of good recipe that I would want to give a try! Buttermilk Raisin and Orange Scones was one of them.

I've made the 2nd batches as well for this jammers as this is quite simple and the outcome was simply nice :)

At my 1st attempt, I almost wanted to throw away the jammers after sitting in the oven for 2-3mins as the smell of flour was very strong (I added more flour as it was too sticky). But then I told myself to be patient and give "them" a chance.... and I was right! The nice aroma of the jammers coming out from the oven put a smile on me and my maid's face ^.^

Buttermilk Mix Fruits and Orange Scones


Well, 1st attempt and I like the smell and the texture and the taste... already made 2nd batches ^.^

The recipe calls for raisin but I only have mix fruits and it works well! Even if I've bought raisin now, I will stick to mix fruits =)

One thing I would like to highlight here is the use of orange zest gives the HIT of the scones and try not to opt-out this if you ever want to try.

I made this on Sunday and put them in the freezer. I will take few of them in the fridge before I go sleep so that in the morning, I can just take it out and bake in the oven ^.^

Almost forgot 1 more thing, I didn't pat my scones' dough into flat-round-disk and cut into wedges (stated in the recipe) as I found that it was a bit too big piece for breakfast. I actually take a small portion of the dough and roll to rectangular shape about 3"Lx2"Wx1/2"H.

Original recipe from a book I borrowed from Jurong Regional Library, will go back home and check out the name of the book and also write down the recipe =)

Thursday, June 17, 2010

Homemade Pizza with Onion Topping


4th attempt on trying out different homemade pizza recipe.

The different with previous attempt is: no more barbecue chicken, although they (husband, brother and my maid) don't mind. But I would like to try out something new.

This round, I choose to follow a recipe from a book that I borrowed from Jurong National Library, "the Art & Soul of Baking" by Cindy Mushet.

The simple pizza dough plus simple toppings attracts me to give it a try.
The crust was just nice and husband said he loves this the most so far ^.^

Steam Pork Ribs with Chilli Bean Sauce and Tau-fu 豆浆蒸排骨


Another dishes that I like to prepare.

Thursday, June 10, 2010

Sweet and Sour Pork - 咕噜肉


Well, this is not my 1st attempt. Just that I forgot to take photo whenever I prepare this dishes ^.^

ermh.. should have put either carrot or the red-pepper or tomato so that there would be more colorful!

Tuesday, June 1, 2010

Homemade Caeser Salad


This is 1st attempt making Caeser salad... using romaine lettuce ^.^

I'm not a salad person. However, hubby suggested to have salad as breakfast, of course I'm more than willing to prepare.

Comments/feedback from him: the dressing kind of watery and taste not strong enough. Overall, "ok arh" :P

I only tried caeser salad once at Swensens over a dinner with hubby. The day I went walk walk at carrefour, I saw the caeser dressing and bacos' bits and decided to buy both of them. Then, yesterday finally saw the romaine lettuce available and I bought 2 box for $5.90.

Well, I'm all prepared! I actually tasted the caeser dressing and found that the taste a bit sour (as compare to Swensens' one, it was a bit sweet). So, I added little bit of honey and olive oil to the caeser dressing. Is that why it looks watery?

Guess I gotta do more survey :P

Monday, May 31, 2010

Outrages Brownie - Yummy!


Yes! I like this and this is soOOoo cute!

Thanks to Gert from mykitchensnippets ^.^

I was fall in love with this tiny brownie! Especially small tiny little brownie that I can just eat without having to cut into pieces.

I've made some adjustment to suit my taste, you may refer to the original recipe here.


Ingredients:
(A)
- 113g unsalted butter
- 150g dark chocolate couverture droplets
- 80g bitter sweet chocolate couverture droplets

(B)
- 3 large eggs
- 1 1/2t instant coffee granules
- 1T vanilla extract
- 3/4C sugar

(C)
- 1/2C plain flour
- 1 1/2t baking powder
- 1/2t salt

(D) - toss together
- 2T plain flour
- 100g semi-sweet mini chocolate chips
- 1C chopped walnuts + pecans (as I do not have enough walnut)

Method:
1. Double-boiler @ low heat to melt (A) and set aside cool slightly.
2. At another bowl, sift (B). Pour (A) into sifted (B) and stir till incorporated. Set aside till room temperature.
3. Stir in (C) into the mixture from (2) and add in (D).
4. Greased small muffins pan and scoop batter to just nicely full/lesser into the muffin mold.
5. Bake in preheat oven @ 176C for 12mins.


Coconut Buns


This consider 50:50 successful: failed buns :P

Reason why? The bottom of the buns didn't seem to be "cooked" :( I still got the dough-like stretchable texture =.=" Other than that, the top texture was nice!

I've covered with foil after 10mis baking time but I increased the temperature from 180C to 220-200C for the rest of the baking time(15mins). Still, I can't get the bottom part baked properly :(

Other than that, the flour mixture in the coconut filling was a little too much causing the taste a bit "scary" after I finished the entire bun (I remove those unbaked portion).

Almost a SQUARE


This is a recipe from HHB.


However, my bread not as pretty as HHB and I so wanted to achieve that kind of texture, should I just tear the bread like what HHB did to get the same look of the texture? Will definitely try this again.

Another closer look: Feeling like a soft towel hoOOorr...Guess the only thing is the crust wasn't as pretty as HHB?


At this stage, still in love with my eggless soft and fluffy white bread.

Honey Pork Ribs


This is another dishes that my family enjoy!

This wasn't my 1st attempt preparing. I keep forgetting to take a picture before it gone with the dinner ^.^

Fried Chicken with Sunquick/Lemon Gravy


hahaaa.. guess this is 1st posting for dinner meal ^.^ Every time this dishes came out, it surely get finished over the dinner ^.^

Thursday, May 27, 2010

Eggless Soft & Fluffy White Bread (My 1st Choice)


I wrote down the recipe for my maid, ah-sih before heading to work yesterday morning. It was a very simple recipe and all she needs to do is to put the ingredients according to my numbering :) Then set BM256 to Basic function, Light crust and 500g loaf size and here's the beautiful white bread.


I only have the time to cut into slices the next morning. You would see that the top of the bread seems sunken cause it was very soft till not able to keep the shape and I have to hold it properly while slicing it. But please, take a look at the soft and fluffy texture of the bread.

I would like to highlight that this bread was baked yesterday and it could still be soft and fluffy while I'm cutting it and taking photos ^.^ Guess it helps a lot putting the bread into airtight container that I've bought yesterday @ carrefour :P (I just put the entire loaf inside last night and slicing it morning)


Thanks to Irene for sharing this recipe! I didn't call it crusty bread as my crust was not crusty but just normal.


*****Ingredients:
- 1C low-fat-milk (I used HL milk)
- 2 1/2C breadflour (=300g)
- 1t salt
- 2T sugar
- 1t yeast
- 2T unsalted butter (=28g)

Method:
1. Put all ingredients (except butter) according to the breadmaker's instruction.
2. Set to Basic function, Light crust and 500g loaf size.
3. Add butter after 10mins of kneading.


Kenwood BM256


This is the breadmaker machine that I've bought from BEST DENKI @ PS. Cost S$248.

It comes with 11 functions and so far, I've only tried out 4 functions: Basic, Sweet, Dough and Jam.

I'm not so satisfy or I should say I felt disappointed with the Jam function :P I thought it should keep kneading (as in spinning) while baking time. Unfortunately, it only knead for 5mins (if i'm not mistaken) =.="

Other than that, I'm quite satisfy with this simple and easy to use breadmaker ^.^ Not regret at all!

Let's take a closer look on the bread pan:


Monday, May 24, 2010

Hokkaido Milk Loaf

This is a very popular recipe that I've came cross upon searching for soft fluffy white bread.

After the beautiful yummy pineapple jam was out, I quickly prepare to make this famous hokkaido milky bread. Original recipe from here. (I reduce the ingredients to half).


The shape was perfect. Thanks to the pullman tin (400g size of dough) bought from Phoon Huat.

The inner was soft and fluffy. You can see the holes in the photo taken.

And last but not least, since everybody talking about this bread. I can't help but take one more shot of this nicely baked bread.


Ingredients:
- 270g breadflour
- 30g cakeflour
- 5g yeast
- 15g milk powder
- 40g brown sugar
- 4g salt
- 1/2 egg
- 125ml fresh milk
- 75g whipping cream

Method:
1. Put ingredients according to breadmaker's instructions.
2. Normal Bread setting, 500g loaf size and light crust.
3. If using dough-function and bake in oven:
- Dough function + 15mins kneading time. (I restart/reset dough function after 15mins kneading time)
- After kneading completes, take out dough and proof at room temperature till doubled. (my finished dough not soft, but it managed to proof till the top of my bowl within 45mins)
- De-gas and divide 3 and rest 10mins (cover with cling wrap).
- Roll out and roll up and place in pullman tin.
- Final proof till dough reach 90% of pullman tin (cover with cling wrap).
- Bake in preheated oven WITH LID on the pullman tin @ 180C for 30mins.


Apam Balik


I missed this as I was only able to enjoy this when I was back to Malaysia (also with the condition the aunty open for business during my stay :P)


I was so happy being able to come across this recipe from Pei-Lin @ Dodol & Mochi.

Take a closer look and oh-la-la.....!!!

The recipe enough to make 5-6 5/6" diameters apam balik:


Ingredients:
(A)
- 200ml warm water
- 1t yeast
- 120g breadflour
- 30g tapioca flour/starch
- 35-45g sugar (to taste)
- 1/4t salt

(B)
- 2 eggs
- 60ml oil
- 1/2t alkaline water (substituted: 1/2t baking soda + 1/2t water)
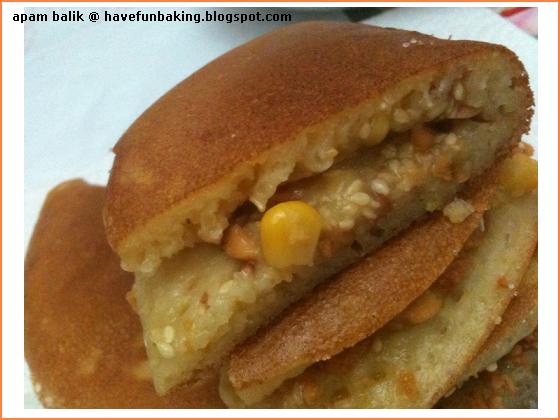
Filling:
- Finely crushed roasted peanuts
- Castor sugar
- Roasted sesame seed
- Canned-style corn
- salted butter (I used margarine)

Method:
1. Mix (A). Mix till lump free and cover cling wrap to proof for 30mins or till doubled and bubbly. (Or can let it proof in the fridge the night before and warm up 10 mins next morning)
Please note: If not proof yet, add a bit warm water and rest/cover 15mins


2. In another mixing bowl, mix (B) and add into proved (A).

3. Heat non-stick pan and pour batter till desired thickness (I used 1/2C+a little bit more). (1st pc: 120C, subsequent 140C, I'm using induction cooker. Cover for 1min.)

4. Cover with lid and cook till surface bubbly (not stick). Sprinkle half of the pancake with topping/fillings.

5. Fold the other side.

Homemade Pizza II - Just nice and easy!


Thanks Pam for sharing the recipe for this pizza dough.
I prepared the dough on last Saturday and was able to enjoy 2suppers and 1 breakfast with compliment ^.^ Left 1 to go, planning for hawaiian-pizza.

This was my 2nd attempt preparing, baking and enjoying eating homemade pizza. The crust was thicker than my 1st attempt and it was the right crust that my family loves! Not too thin and yet not too thick ^.^ (compare the thickness with slices of barbecue chicken/tomato, should say double the size of the thin-crust pizza from my 1st attempt.)

The recipe was so simple and Pam was so nice describing step-by-step in detailed for a newbie like me ^.^

Ingredients:
- 1 3/4C water, ice-cold
- 1/4C oil (I used canola oil)
- 4 1/2C all purpose flour, chilled
- 3/4t salt
- 1T sugar
- 1t yeast

Method:
1. Put the ingredients according to the breadmaker's instructions and set to dough function. Restart/Reset to dough function after 15mins of kneading.

2. After kneading completes (finished dough should be springy, elastic, and sticky, not just tacky), remove the dough from the baking pan and divide to 4pieces on oil-parchment.

3. Sprinkle flour over the dough and shape into ball.

4(a). Store for few months: Pour some oil (few Ts) on a medium bowl and dip each dough into the oil so that it completely cover in oil. Or dip hand in the oil and touch the ball to cover it with oil.

- Put each ball in separate ziploc/bag and store in freezer (no longer than 3mths)

- Transfer to fridge 1 day b4 you want to cook. Remove from fridge 2hrs (or 1hr) before cook-time.

4(b). Store for few days: Put in a ziploc bag together with the pan. Mist them with spray oil and store in fridge for atleast 1-3days.

5. Roll out dough into round disc, spread a layer of pizza sauce, followed by mozzarella cheese. Then sprinkle desired topping and finally another layer of cheese.

6. To avoid sauce "leak out" and cause the crust to be wet, I use 4 chopsticks to secure each side :P

7. Bake in preheat oven @ 220C at lower-mid rack for 20mins.

I've simplified the steps for my own future reference. Please refer to the original recipe here.


Yummy Pineapple Jam

Very nice pineapple jam made by my maid, ah-sih!

Initially, I wanted her to use the BM256 to do the job by setting it to jam function. Unfortunately, the kneading processing only took 5mins, the rest was just heating without stirring. Of course, the end result not satisfying.

So, she kept the jam for the next day. Using a food processor to blend the finely chopped pineapple and stirring under low-heat for 20-30mins and she was so happy with the result! And she jumping to joy when I show her this photo, ohHHhhh.. cantiknya! (in Malay means beautiful!)

Still, i was wondering if I should only finely chopped the pineapple or I should use food processor to process the pineapple and bake using the breadmaker. I will find out with my next attempt for sure!

Also, last but not least, thanks for chop chop a to z for the simple pineapple jam recipe!


Ingredients (modified to my taste):
- 2 medium ripe fresh pineapple (I bought Malaysia Honey Pineapple from NTUC, 2 for $2.50)
- 1C sugar (I've added 2T later, adjust to your preference)
- 3T lemon juice
- 1/8t ground cinnamon

Method
1. Peel skin and Finely chopped pineapple till small or blend it using food.
processor.
2. Combine all ingredients and keep stirring @ low-heat for 20-30mins or under thickened with only little bit of liquid. Cool down and keep in jar.

Please note: I split into 2 small container. 1 kept in the fridge (more) and another (lesser) at room temperature. And I will transfer to room whenever I finished.

My way of storing might be different from others as the life-span of the pineapple jam is definitely shorter as I like pineapple jam and use it to be filling for bread as well.


Monday, May 17, 2010

My precious in rain-coat


hahahaaa.. can't help blogging this cause they are so cute!!!

They were actually preparing to go down with daddy. Daughter was not feeling well and wanted to go see doctor and it was raining.

Sadly, didi-saysiong not able to follow when reach downstairs as the rain was not only drizzling.. but getting heavier. So, I just let him walking under the rain and jumping here and splashing here and there.

Then I played a trick saying want to go up get umbrella :P naughty mummy! and then only he followed me up. But sitting at the door step and keep asking me to take umbrella... but i was too busy preparing pizza :P


Pork Floss and Raisin Loaf

Yes, I like both pork-floss and raisin. Well I should put it this way: my kids love raisin and my husband loves pork-floss. And it was very troublesome to divide and shape the small dough one-by-one, so I decided to divide the dough into 2, 1 rolled up with raisin and another with pork-floss.

This is great ideal as my maid (Indonesian) can enjoy her raisin part while leave the pork-floss part for others :P

I've tried cottony soft sweet loaf recipe from Angel. The result was nice:


Then I came across water roux method from Dodol & Mochi and wanted to give a try. It was indeed softer and more fluffy. However I wonder if the way I prepare my water roux is correct or not :P cause when I mix the rest of the ingredients with water roux, the dough couldn't be formed, it's too runny. I ended up adding a little bit bread flour.

But luckily, the end result was nice:


Ingredients & Method:
For water roux:
1:5 = breadflour:water = 20g breadflour: 100ml water
1. Mix and put in saucepan or double-boiler.
2. Keep stirring till reach the stage.
3. Put in bowl, cover with cling wrap till touches surface of the water roux. Keep in fridge if not use (up to 3 days max).

For bread/dough:
- 80g water
- 1 egg
- 85g water roux
- 250g breadflour
- 20g milk powder
- 1/2t salt
- 40g sugar (I used 60g)
- 1t yeast
- 30g butter

Method:
1. Put ingredients according to breadmachine's instruction.
2. Dough function.
3. Add butter after 7-8mins of kneading.
4. Normally I will take out dough after kneading complete and do the proofing (60mins) at room temperature in a bowl that covers with cling wrap.
5. De-gas, divide and rest 10mins.
6. Shape/put filling and place in pan, final proofing 30-40mins/doubled the size.
7. Brush egg wash and bake on preheat oven @ 180C/15-20mins. Cover with foil to avoid burning on top.


Homemade Pizza - Thin Crust

Thanks Margie for sharing her recipe! (i'm still getting her permission to link to her blog ^.^)

"Do you want to make pizza yourself? And put topping by yourself?" my question to my 5yrs-old daughter. "Yes!!" she answered.

I was trying to find a recipe that she can at least participate as she was not feeling well for 2weeks already. Want to entertain her ^.^ Also, my husband loves pizza as well. So, 1 stone 2 birds! :P

Let's take a look of the result:


"ermmMMmmhhh.. yummy! Delicious!!" comments from my husband, my elder brother, my maid ^.^
The recipe made 1small size pizza and 2big size pizza. All finished up 1 hour after taking out from oven!!! woOOohooOooo!! Contented!

aiyakk!! Now then I remember I forgot to poke the pizza with folks before putting the topping :P


Ingredients:
- 3/4C warm water
- 2T oil
- 2C bread or all-purpose flour (I used breadflour)
- 1/2t sugar
- 3/4t salt
- 1 1/2t yeast

Method (written in shortform for my future reference):
1. Dough function.
2. De-gas and divide 2 portion shape round, put in oiled+floured ZipLoc bag.
3. Store in fridge 1-5days.
4. When you ready to bake, bring to room temperature. While waiting, prepare all toppings.
5. Punch, flatten and roll to round disc on lightly floured surface.
6. Poke with folks. (I forgot to do this)
7. Put cheese layer, put topping(s) and followed by another layer of cheese.
8. Bake on preheat oven @ 220C for 20mins.

Please note that all the yeast I've used was instant-dry-yeast in 11g/sachet form.


My First 烧包

haahaaa.. I'm soOOoo happy with the result ^.^
I was a bit worry of the outcome cause the I felt the skin a bit too thick.. But I was wrong as the thickness will contribute to the layers of the flaky skin of the entire feature!

BEFORE:


AFTER:


woOOoohoOOOoo!!! Now, let's take a look at the "inner beauty":


It's definitely worth the effort of preparing it!
The filling was a bit too salty and it should have sweetness instead. I will try to bake this again! For sure!!

Thanks Jane for sharing this recipe! Muacks!

And thanks to my little helper:


Ingredients:
For the skin:
- outer: 200g plainflour, 35g oil, 1T sugar, 90ml water [mix together till smooth and rest 30mins cover with cling wrap]
- inner: 100g cakeflour, 60g shortening/ghee (i used vegetable-shortening bought from NTUC) [mix till form dough, DO NOT overmix, else will become sticky]
For the filling: (I've modified/added others to my taste)
- roasted-meat(叉烧肉) around 160g-180g, 1 big-onions cut into pieces, 1/2C of green-beans+carrot, 2T-3T of sesame oil, salt+sugar+honey+oyster sauce to taste.

Method:
1. Prepare filling: fried onions with sesame oil, add in roasted meat, then green-beans+carrot. Then add salt+sugar+honey+oyster sauce to taste :) Set aside till cool down. To be used later.
2. Wrap 1 outer-skin to wrap 1 inner-skin, roll-out and roll-up. Repeat once. Roll 2 edges together and rest 10mins.
3. Roll to round disc and wrap filling, brush egg-wash and sprinkle sesame seeds.
4. Bake on preheat oven @ 200C/25-30mins.


Wednesday, May 12, 2010

Mother's Day Strawberry Jams - from my son


Something very happy to share...
I did ask him to apply the strawberry jams on the bread. But he happily eat the bread himself.. hahahaa.. I was so happy to see that my son enjoy it and thanks for his teachers for organizing this!

Btw, don't understand why this picture was rotated though my original copy wasn't look like this :(

Honey Buns


My 1st honey buns from HHB's recipe.

I wanted to try something else other than raisin :P Also trying to look for a good recipe to make my husband's favorite Pork Floss buns ^.^

Have to wait till tomorrow to see if the buns still as fluffy as this morning so that i can try out wrapping pork-floss inside the buns. Will update again tomorrow.

Note: I baked this and took it out from oven on 11 May 2010 @ 11:47pm, it was over 8hours when I took the picture this morning.


Ingredients: (makes 9 buns)
- 1 egg lightly beaten plus enough milk to make 200g
- 50g honey [good enough with filling, if plain, increase a little bit more]
- 300g breadflour
- 4g (about 2/3t) salt
- 4g (1t) instant yeast
- 30g unsalted butter

Method:
1. Dough function.
2. De-gas, divide and rest 10mins covered with cling wrap.
3. Flatten, roll out and roll up. Put in pan (seams-side-down) and final proof 45-60mins/doubled size.
4. Brush with egg-wash/milk.
4. Bake at preheated oven @ 200C/15-20mins. [cover with foil in the middle of baking to avoid burning on top]